

Packing for a 4-7 day motorcycle trip sounds easy until the night before departure. The saddle bags are filling up, three pairs of jeans are staring at you, your toiletry kit somehow weighs more than expected, and you’re still wondering if you need that extra pair of shoes. I’ve been there. On a motorcycle, luggage space is limited, and every unnecessary item eventually becomes something you’re carrying for hundreds of kilometres. This motorcycle road trip packing list is built around a simple idea: carry what protects you, keeps the bike moving, handles Indian weather, and makes the trip easier. Leave the rest.
Why Is Travel Important in Our Life: 10 Benefits of Travel
Travel is more than just visiting new places- it’s about finding new parts of yourself. Why is travel important in our life? This question often comes to mind when we feel the urge to explore. Traveling has many benefits that make our lives better. It helps us see new things, feel happier, and learn more about the world. Continue Reading ►
Quick Answer: What Should You Pack for a Motorcycle Road Trip?
If you’re leaving early in the morning for a long ride, don’t think of packing as simply filling every available bag. Think in priorities. Safety gear comes first, motorcycle emergency equipment comes next, then weather protection, documents, clothes, electronics and personal items.
For an Indian road trip, I’d consider a helmet, riding jacket, gloves, protective trousers or knee protection, proper riding footwear, rain gear, basic tools, puncture repair equipment, a tyre inflator, documents, water, medicines and a small first-aid kit essential. Clothes come after that.
The same applies to luggage. A saddle bag can carry the bulk of your clothing and larger items, while a tank bag is much more useful for things you may need at a toll booth, fuel stop or roadside tea break. Nobody wants to unpack an entire saddle bag just to find a wallet.
If you’re riding through the monsoon, add another layer of waterproofing. If you’re heading towards the Himalayas, the clothing list changes considerably. Your destination matters.
The Essential Motorcycle Road Trip Checklist
Here is the short version you can screenshot before leaving. I prefer separating the list into must-carry and nice-to-have because a motorcycle trip can quickly become an excuse to carry half the house.
Must-carry:
- Helmet
- Riding jacket
- Riding gloves
- Riding pants or suitable protection
- Riding shoes or boots
- Rain gear
- Saddle bags or suitable motorcycle luggage
- Tank bag
- Phone and charging cable
- Power bank
- Driving licence
- RC
- Insurance documents
- ID
- First-aid kit
- Personal medicines
- Water
- Snacks
- Puncture repair kit
- Tyre inflator
- Basic motorcycle tools
- Spare key
- Sunscreen
- Basic toiletries
- Emergency contacts
- Cash/card with UPI as a backup
Nice-to-have:
- Sunglasses
- Neck gaiter
- Small towel
- Action camera
- Extra charging cable
- Chain lubricant
- Zip ties
- Duct tape
- Compact torch
The important part is not buying everything on this list. Some riders already own suitable gear, while others need to build the kit gradually. We at AlarTravels would rather see you spend ₹500 on something genuinely useful than ₹2,000 on an accessory that stays buried in your luggage.
Motorcycle Pre-Trip Checklist: Prepare the Bike Before You Pack
Packing your bags is only half the preparation. A beautifully organized motorcycle is still a bad travel companion if the tyres are questionable or the chain has been neglected.
The day before departure, give the motorcycle a proper walk-around. Check tyre condition and pressure first. Look for obvious damage, unusual wear or anything that makes you uncomfortable. Check the brakes and make sure the braking feel is normal. Look at the chain, and lubricate it if required according to your motorcycle’s maintenance needs.
Then check engine oil and coolant where applicable. Test the headlight, taillight, indicators and horn. Make sure the mirrors are properly positioned. Check the battery condition if there has been any recent warning sign, and don’t forget fuel.
Indian highways can be wonderfully convenient until they suddenly aren’t. A fuel station or mechanic may not appear exactly when you need one.
What to Check on the Motorcycle Before a Long Ride
My preference is to do this inspection before loading the bags. Once luggage is mounted, some areas become harder to access, and nobody wants to discover a loose mounting point after leaving home.
Run through:
- Tyre condition and pressure
- Brake pads and braking feel
- Chain condition and lubrication
- Engine oil
- Coolant where applicable
- Battery
- Headlight and taillight
- Indicators
- Horn
- Mirrors
- Fuel level
- Loose bolts
- Luggage mounting points
Also check that the luggage itself isn’t interfering with the exhaust, wheel, chain, suspension movement or indicators. This sounds obvious. It is also exactly the sort of thing that gets missed during a late-night packing session.
Before loading your bags, I’d also recommend checking how to prepare your motorcycle for a long ride, because a well-packed bike is not much use if the tyres, chain, brakes or fluids haven’t been checked.
Best Motorcycle Luggage for a Road Trip: What Goes Where?
Motorcycle luggage is one area where I think riders often buy more than they actually need. You don’t necessarily need three different bags because you’re travelling for a week. You need enough organised storage that the motorcycle remains manageable and your important items are easy to reach.
Saddle bags are useful for clothes, footwear and other relatively bulky items. A tank bag makes sense for things you reach for repeatedly: wallet, phone, documents, sunglasses, snacks or charging accessories.
The trick is access plus balance.
If you put all your heavy items on one side, the bike can feel different from what you’re used to. If your raincoat is buried underneath four days of clothes, you’ll regret it the first time a monsoon shower appears on the highway.
I’ve noticed that the best packing systems are usually boring. Everything has a place, and you know exactly where that place is.
How Much Motorcycle Luggage Do You Actually Need?
A rough starting point can look like this:
| Trip duration | Practical luggage target |
|---|---|
| 1-2 days | 15-25L |
| 3-4 days | 25-35L |
| 5-7 days | 35-45L |
| 7+ days | 40-60L+ |
These are guidelines, not rules. Your clothing, weather, camping equipment and personal needs can change the requirement significantly.
For a two-day weekend ride, I’d question anything approaching a huge luggage setup. For a week-long Himalayan trip, the same capacity may feel restrictive once warm layers and weather protection enter the picture.
Don’t choose a bag simply because the number of litres sounds impressive. Check how it mounts to your motorcycle, how it affects access to the seat, whether the weight sits sensibly and how you’ll protect the contents from rain.
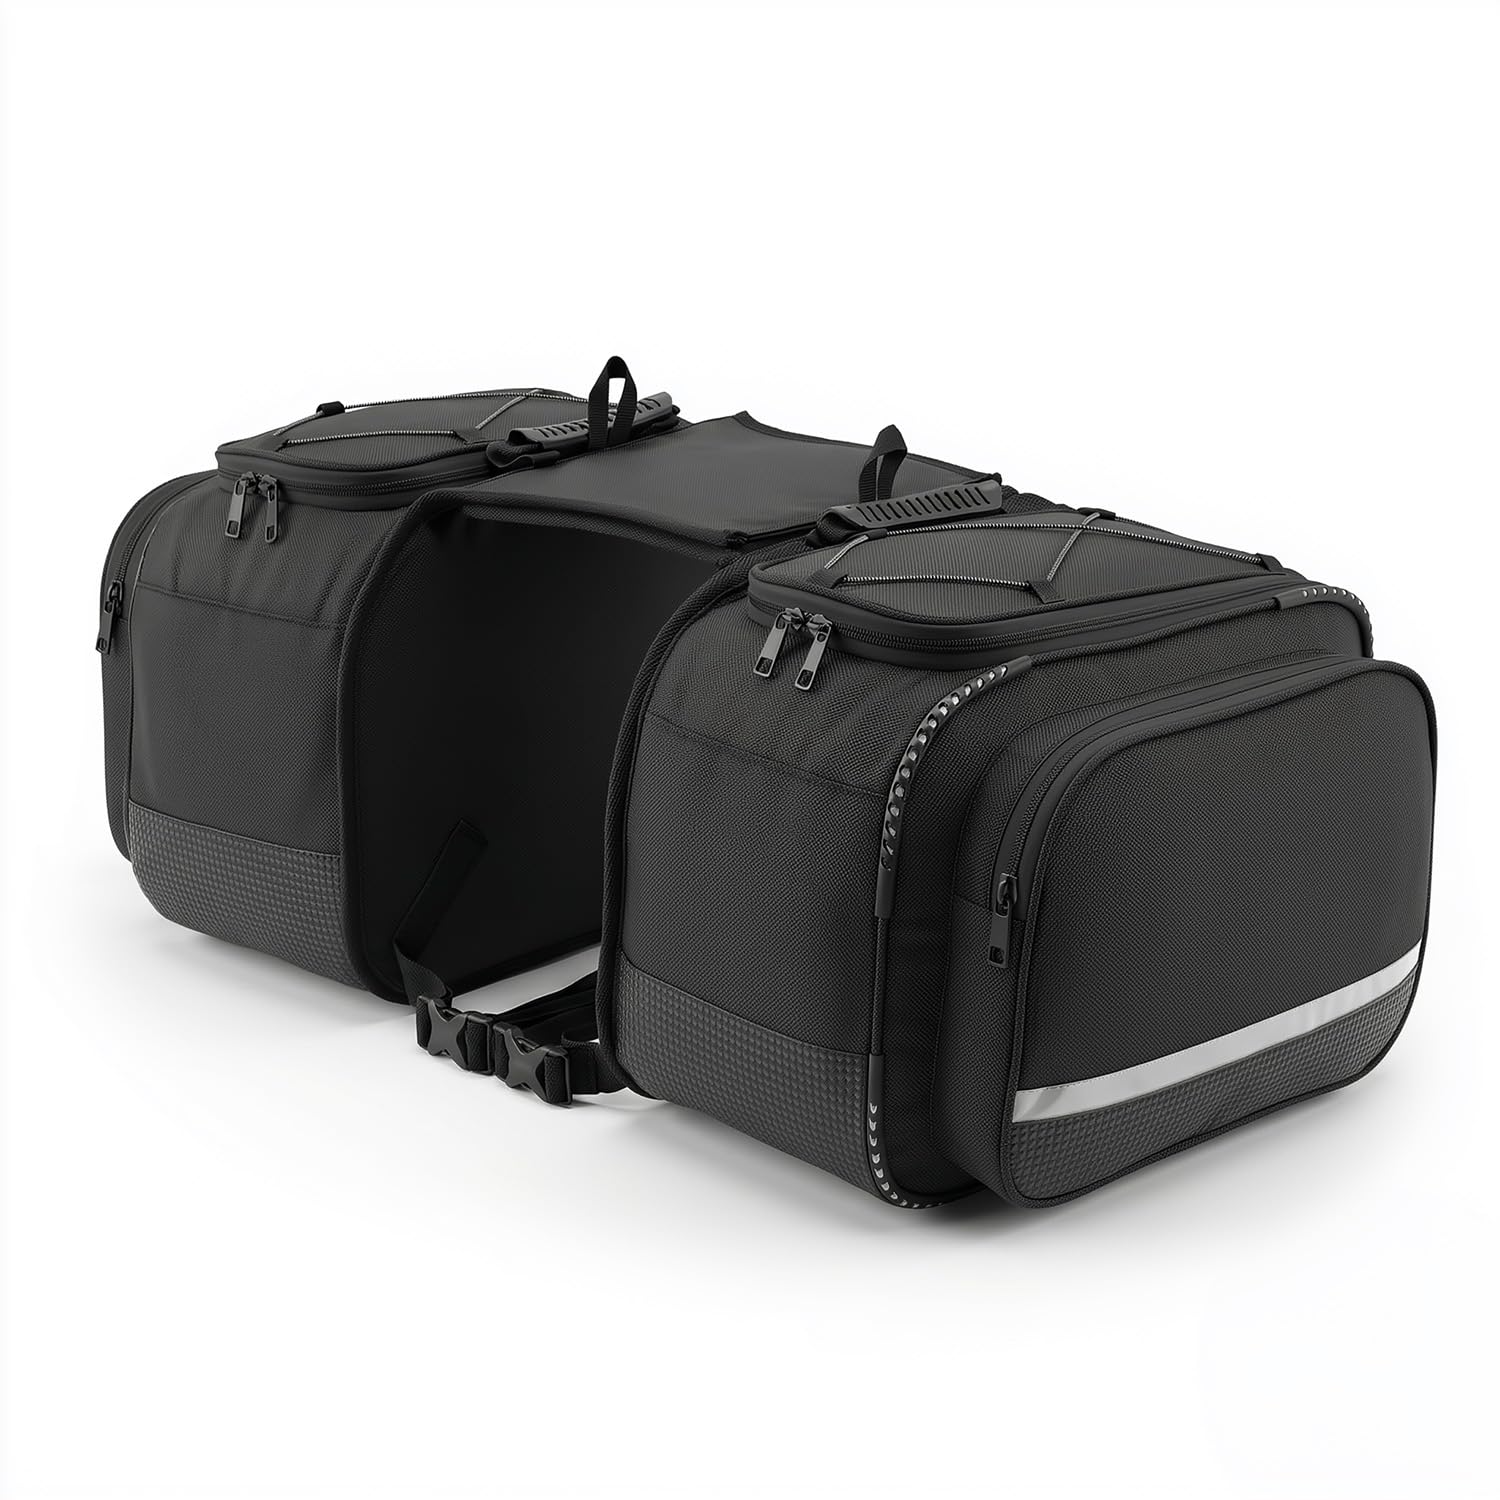
A saddle bag makes the most sense when your main problem is where to put clothes and larger travel items without wearing a backpack throughout the ride. The FATMUG Motorcycle Saddle Bag with Rain Cover is worth considering if you’re looking for a dedicated motorcycle luggage option with rain protection.
I’ll be honest – a saddle bag isn’t automatically the right choice for every motorcycle. Before buying, check how it will mount on your particular bike, whether the available capacity matches your trip and whether the positioning leaves enough clearance around hot or moving components.
For a 5-7 day ride, I’d use the main luggage for clothes, toiletries and less frequently accessed items. Keep emergency gear somewhere you can reach without unpacking everything.
The physical detail I’d pay attention to is the rain cover. On an Indian monsoon ride, that extra layer matters when a blue sky suddenly turns into a wall of rain.
This is not a substitute for sensible packing. A huge bag filled to the top can still make a trip harder.

A tank bag solves a different problem. You don’t want to open your main luggage every time you stop for fuel, check your phone or need your wallet.
The GUARDIANGEARS Jaws Mini 18L Magnetic Tank Bag is an option to consider when quick access is more important than maximum storage.
The magnetic design is the main thing I’d examine before buying. Check compatibility with your motorcycle’s tank and the way the bag will sit while riding. A tank bag should make access easier, not create a new distraction.
I would use this space for relatively small, frequently needed items: wallet, phone, documents, sunglasses, snacks, charging cable or other essentials.
The one physical detail that stands out from the product’s positioning is its 18L size. That’s substantial for a tank bag, so don’t automatically fill it just because the room is available.
Maybe that’s the biggest packing lesson here. Empty space is useful too.
Where to Put Everything on the Motorcycle
A simple packing map makes a surprisingly big difference.
Tank bag:
- Phone
- Wallet
- Driving licence
- Frequently needed documents
- Sunglasses
- Snacks
- Charging cable
- Small personal items
Saddle bags:
- Clothes
- Toiletries
- Footwear
- Rain gear when not immediately needed
- Larger personal items
Rider’s pockets:
- Only genuinely important small items
- Avoid bulky objects that become uncomfortable while riding
Emergency-access location:
- Puncture kit
- Tyre inflator
- First-aid kit
- Essential tools
Keep the weight as balanced as possible between the sides of the motorcycle. Heavy items should generally sit low rather than high and loose.
If you’re still deciding which bike-specific accessories are genuinely useful, our guide to essential motorcycle accessories for long rides is worth a look before you finalize your setup.
Best Riding Gear to Pack for a Motorcycle Road Trip
I wouldn’t treat riding gear as optional luggage. Your casual clothes can be reduced. Protective equipment shouldn’t be the first thing sacrificed because the saddle bag is full.
A proper helmet comes first. Then consider a riding jacket, gloves, suitable riding trousers or protection, and footwear that is appropriate for motorcycle riding. The exact setup depends on your motorcycle, route and riding conditions, but the basic principle is simple: protect the parts of your body that are exposed when things go wrong.
Indian weather makes this slightly harder. A jacket that feels reasonable during a cool morning ride can become uncomfortable in summer heat. That’s why ventilation matters, but ventilation should not become an excuse to ignore protection.
I’ve sometimes found that riders focus too heavily on looking like they’re going touring and not enough on whether the gear will actually be comfortable after several hours.
Helmet, Riding Jacket and Protective Clothing
Your helmet should be properly fitted and suitable for the kind of riding you’re doing. Don’t buy a loose helmet because it feels more comfortable in the shop. Comfort matters, but fit comes first.
A riding jacket should make sense for the weather and duration of your trip. For hot Indian conditions, ventilation becomes particularly important. For mountain rides, layering becomes more useful.
Riding trousers or suitable knee protection can make sense on longer journeys, especially when highway speeds and extended riding hours are involved. Proper riding footwear is another item I wouldn’t leave behind simply to save luggage space.
Your ordinary sneakers may feel fine while walking around a town. That doesn’t automatically make them ideal riding footwear.
And remember: protective equipment is not the place for an aggressive bargain hunt. If something doesn’t fit correctly, the low price isn’t much of a victory.

Gloves are easy to underestimate because hands don’t feel particularly vulnerable while you’re standing beside the motorcycle. Spend several hours riding, though, and you’ll understand why they matter.
The TVS Riding Gloves for Men-Mesh for Ventilation are worth considering for riders who specifically want a ventilated glove option for warmer Indian riding conditions.
This isn’t a recommendation to buy gloves purely because they’re ventilated. Check the fit, protection features and intended use before purchasing. A glove that feels airy but doesn’t fit securely isn’t solving the complete problem.
The most relevant physical detail here is the mesh ventilation mentioned in the product name. That’s the feature that makes the option particularly interesting for hot-weather riding.
This is not for someone who simply wants a casual pair of hand covers for short city errands. For a road trip, I’d be much more particular about fit and riding suitability.

Indian weather can change faster than your packing plan. A morning departure under clear skies doesn’t guarantee a dry afternoon, particularly during the monsoon or in hilly areas.
The ZEEL Rain Coat for Men Waterproof for Bike Riders is worth considering as a dedicated rain layer to keep in your motorcycle luggage.
I’ll be honest – a raincoat is one of those things that feels unnecessary until you need it. Then you really want it.
Before buying, check the fit over your riding gear and think about how easily you can put it on at a roadside stop. You don’t want to discover that the rain layer is too restrictive once you’re already wearing your jacket.
The sharp physical detail to notice is its coat-style outer layer, which is the part you’ll actually be pulling over yourself when rain arrives.
For monsoon trips, I’d also keep at least one dry change of clothes protected inside the luggage. Wet rain gear and dry clothing shouldn’t share the same unprotected space.
Clothing Packing List: How Many Clothes Do You Really Need?
This is where most motorcycle packing lists become unrealistic.
You don’t need a fresh outfit for every photograph. You need enough clean clothing to stay comfortable, plus enough flexibility for weather and washing.
For a short trip, I’d rather carry quick-drying clothes and repeat a layer than fill an entire saddle bag with cotton shirts. If you’re staying in hotels or guesthouses, washing a few small items can be much easier than carrying double the wardrobe.
Indian road trips also vary wildly. A summer Rajasthan ride is a completely different clothing problem from a cold Ladakh journey. A monsoon ride through the Western Ghats introduces another one.
So don’t copy somebody else’s clothing quantity blindly.
Clothing for a 2-3 Day Motorcycle Trip
For a 2-3 day trip, a practical starting point could be:
- 2 T-shirts
- 2-3 pairs of underwear
- 2-3 pairs of socks
- 1 casual trouser
- 1 comfortable riding layer
- 1 light additional layer if needed
- Sleepwear if required
- Rain protection
- Small towel
I’d keep the clothing compact and easy to dry. One lightweight quick-drying shirt can be more useful than another heavy cotton one.
The same applies to socks. They don’t take much space, but wet socks become unpleasant very quickly during a rainy ride.
You can also wear your bulkiest footwear while travelling rather than packing multiple shoes. There is no prize for having the largest luggage setup at the fuel station.
For most weekend trips, the goal should be two or three days of practical clothing, not a portable wardrobe.
Clothing for a 5-7 Day Motorcycle Trip
For 5-7 days, don’t simply double the 2-3 day list.
A more sensible approach is:
- 3-4 T-shirts
- 4-5 pairs of underwear
- 3-4 pairs of socks
- 1-2 casual trousers
- 1 additional warm/light layer depending on destination
- Sleepwear
- Rain protection
- Small towel
- Basic laundry option
If you’re staying in hotels, homestays or guesthouses, you may be able to wash smaller items during the trip. That can save significant luggage space.
I’d also separate clean clothes from worn clothes. Even a simple washable bag can stop your saddle bag from becoming one giant pile of fabric after day three.
Maybe it’s not glamorous. It works.
Cold-Weather vs Summer vs Monsoon Packing
For Himalayan or high-altitude trips: focus on layers. Thermal clothing, warm socks, gloves suitable for the conditions and an insulating layer may matter far more than extra casual shirts.
For summer rides: prioritise breathable clothing, hydration and sun protection. Rajasthan heat and long highway stretches can be exhausting even when the motorcycle itself is performing perfectly.
For monsoon rides: waterproofing becomes the priority. Carry rain gear, spare socks, a dry clothing set and additional protection for electronics and documents.
Don’t use one universal clothing list for all of India. The country can give you chilly mountain mornings and humid coastal afternoons within the same broad travel season.
Motorcycle Emergency and Repair Kit: What You Should Never Skip
The emergency kit is where I’d rather see a rider carry a few useful things than a huge toolbox.
You don’t need to become a roadside mechanic overnight. But you should know what your motorcycle can realistically require during the journey and carry the tools needed for common problems.
A puncture repair kit is particularly relevant for tubeless tyres. An inflator complements it because repairing a puncture doesn’t help much if you can’t restore pressure. Basic tools, spare fuses, zip ties, duct tape and a spare key can also earn their place without consuming enormous space.
One important distinction: don’t carry a tool simply because someone told you it’s essential. If you don’t know how to use it, learn before the trip.
A remote highway is a poor classroom.
OLKINO 12-in-1 Tubeless Tyre Puncture Repair Kit for Cars & Bikes

A tubeless puncture can turn a relaxed road trip into an inconvenient roadside stop. Carrying a repair kit gives you another option when you’re away from the nearest tyre shop.
The OLKINO 12-in-1 Tubeless Tyre Puncture Repair Kit for Cars & Bikes is worth considering for riders who want a dedicated kit in their emergency luggage.
The important limitation is right in the name: this is positioned for tubeless tyre repair. If your motorcycle uses tube tyres, don’t assume a tubeless repair kit solves your problem.
Before leaving, learn how the repair process works for your particular tyre setup. A repair kit sitting unopened in a saddle bag isn’t much help during a puncture.
The physical detail worth noticing is the 12-in-1 format, which indicates a multi-piece kit rather than one single plug tool.
I would store it somewhere accessible. Don’t bury it underneath your clothes.
Amazon Basics Portable DC Digital Tyre Inflator for Cars & Bikes

A puncture repair kit and an inflator make sense together. One addresses the repair; the other helps restore tyre pressure afterward.
The Amazon Basics Portable DC Digital Tyre Inflator for Cars & Bikes is an option for riders who want a portable inflator as part of their road-trip emergency kit.
I’d still check compatibility with your motorcycle and understand how its power connection works before taking it on a long trip. Don’t wait for a roadside emergency to discover that you haven’t figured out the connection.
The physical detail highlighted by the product name is its portable DC format, which is the kind of design intended to be useful around vehicles rather than as a bulky workshop compressor.
This isn’t necessarily something every short-distance city rider needs. For long highway rides, remote routes and trips where roadside assistance may take time, it makes more sense.
Basic Tools and Small Emergency Items
Keep your toolkit compact.
Depending on your motorcycle, useful items can include:
- Basic motorcycle-specific tools
- Spare fuses
- Zip ties
- Duct tape
- Chain lubricant
- Spare key
- Small torch
- Puncture equipment
- Tyre-pressure equipment
The exact tools depend on the motorcycle. Check what fasteners and components you may realistically need before departure.
For Indian highway travel, I also like carrying some cash separately from the main wallet. UPI is incredibly useful, but network or payment problems can happen, especially when you’re travelling through remote areas.
Don’t turn this section into an excuse to carry a 10-kilogram toolbox. If the repair is beyond your ability, the sensible answer may still be finding a mechanic.
Electronics, Documents and Personal Essentials
The motorcycle may be ready, but you still have to travel as a person.
Your phone is probably the most important electronic item. Keep the charging cable, a suitable charging arrangement and a power bank if you rely heavily on the phone for navigation. Download offline maps for stretches where mobile connectivity may become unreliable.
Documents deserve similar attention. Keep your driving licence, RC, insurance and identification available. Digital copies can be useful as a backup, but don’t assume your phone will always have battery or network access.
Then there are the ordinary things that are easy to forget because they’re boring: medicines, sunscreen, toiletries, water and snacks.
Indian road trips often include long stretches between proper stops. A small snack in the tank bag can be more valuable than another camera accessory.
A practical electronics list could include:
- Smartphone
- Charging cable
- Power bank
- Phone charging setup
- Offline maps
- Phone mount if required
- Camera or action camera, if genuinely needed
- Spare charging cable where useful
I would avoid bringing every electronic gadget you own.
If you’re travelling primarily to ride, your phone may be enough for navigation and communication. An action camera makes sense if you’ll actually use it. A laptop is usually unnecessary unless the trip also involves work.
Download important maps before leaving. Mountain roads and remote stretches can be unpredictable when it comes to network coverage.
Also keep your charging cable somewhere accessible. A dead phone at 8 p.m. on an unfamiliar road is not the moment to discover that your cable is buried inside the luggage.
Documents and Money
For an Indian motorcycle road trip, keep the important documents organised:
- Driving licence
- RC
- Insurance
- Government-issued ID
- Emergency contacts
- Relevant permits where required for your route
- Digital backups where practical
Payment should have some redundancy too. UPI is extremely convenient, but I’d still carry some cash and a card.
Keep your main documents protected from rain. A waterproof pouch inside the tank bag is a simple solution.
And don’t keep every important item in one place. Losing one wallet shouldn’t mean losing every payment option and identification document at once.
First Aid, Medicines, Toiletries and Hydration
Keep the first-aid kit small and practical. Personal medicines should take priority over generic items you may never use.
A compact personal list can include:
- Regular medicines
- Basic first-aid supplies
- Sunscreen
- Lip balm
- Hand sanitizer
- Wet wipes
- Toothbrush and toothpaste
- Small soap or wash product
- Deodorant
- Small towel
- Water bottle
- Dry snacks
Indian summer riding makes hydration especially important. During monsoon rides, hydration still matters even when the temperature doesn’t feel extreme.
You don’t need a full bathroom in your saddle bag.
Travel-sized toiletries are enough for most hotel-based trips. If you’re camping, the requirements change, but don’t add camping equipment unless the trip actually requires it.
Motorcycle Road Trip Packing List: Quick Comparison of What to Carry
At this point, the list can feel long. Here is a quick comparison. Not exact to the rupee or gram, but close enough to guide your packing decisions.
| Category | What to carry | Where to keep it | Priority |
|---|---|---|---|
| Riding gear | Helmet, jacket, gloves | Rider | Must |
| Rain gear | Rain coat | Easy-access luggage | Must |
| Clothes | 2-4 practical outfits | Saddle bag | Must |
| Documents | DL, RC, insurance, ID | Tank bag | Must |
| Electronics | Phone, charger, power bank | Tank bag | Must |
| Repair | Puncture kit, inflator, tools | Accessible luggage | Must |
| Health | First aid, medicines | Easy-access pouch | Must |
| Hygiene | Toiletries, wipes | Clothes bag | Useful |
| Snacks | Dry snacks | Tank bag | Useful |
| Camera | Camera/action camera | Protected pouch | Optional |
The word priority matters here.
A camera is optional. A helmet isn’t.
A second pair of casual shoes is optional. Rain protection on a monsoon ride isn’t.
A fancy travel gadget can wait. Your motorcycle’s emergency equipment should not.
How to Pack a Motorcycle for a Long Road Trip
The actual packing process matters almost as much as what you bring.
Start by laying everything out on the floor. Separate it into four groups: riding gear, clothing, emergency equipment and frequently accessed items.
Then assign each group a home.
Heavy items should generally sit low and be distributed sensibly. Avoid creating a large weight difference between the two sides of the motorcycle. Once everything is loaded, physically check the luggage and mounting points.
Give the motorcycle a gentle push and check that nothing is moving around unnecessarily.
The biggest mistake is packing for convenience at home rather than convenience on the road. The item you need most frequently should be the easiest to reach.
Keep Heavy Items Low and Balanced
Don’t put all your heavy items into the highest possible part of your luggage.
Try to keep heavier equipment lower and distribute it between the sides. Your clothes can occupy some of the remaining space without creating a lopsided setup.
After loading, check the motorcycle from behind. Look at the left and right sides. Are the bags sitting similarly? Are straps hanging close to the wheel or chain? Is anything touching the exhaust?
These few minutes are worth taking.
Also remember that the motorcycle’s handling can feel different once loaded. Take the first few kilometres slowly and get used to the additional weight before settling into highway speed.
A balanced luggage setup is not about making the bike look neat. It is about making the ride predictable.
Waterproof Your Clothes and Electronics
A rain cover over the luggage is useful, but I wouldn’t make it your only line of defence.
For important electronics and documents, use an inner waterproof pouch or suitable dry bag. Keep clean clothes inside another protected layer where practical.
Separate wet rain gear from dry clothing. Otherwise, one rainy afternoon can turn your entire clothing bag into a damp mess.
This matters even more in India’s monsoon season, where rain can appear unexpectedly on an otherwise sunny route.
And don’t forget the small things. Your phone charger, documents and power bank are just as vulnerable to water as your clothes.
Dry inside is the goal.
Keep Emergency Items Easy to Reach
Your puncture kit should not be underneath six days of clothing.
Neither should your rain gear.
I would create a small emergency-access zone containing:
- Puncture repair kit
- Tyre inflator
- Basic tools
- First-aid kit
- Rain layer
- Spare key
The exact arrangement depends on your motorcycle luggage, but the principle stays the same: if something goes wrong beside a highway, you should be able to reach the relevant item without unpacking your entire trip.
The same goes for snacks and water. A small snack in the tank bag is much easier to reach during a break than something hidden at the bottom of a saddle bag.
What NOT to Pack on a Motorcycle Road Trip
One of the best ways to improve a packing list is to remove things.
Motorcycle luggage encourages a strange habit: once you have space, you feel compelled to fill it. Then you’re carrying heavy bags for hundreds of kilometres simply because you had room.
I’ve noticed this especially with clothing. Three extra shirts feel harmless individually. Add shoes, toiletries, camera equipment and miscellaneous gadgets, and suddenly the luggage has become the trip.
Your goal isn’t maximum capacity.
It’s useful capacity.
Leave These Items at Home
I’d question:
- Excessive clothing
- Multiple pairs of casual shoes
- Large toiletry bottles
- Bulky towels
- Unnecessary electronics
- Duplicate charging accessories
- Heavy camera equipment you won’t use
- Tools you don’t understand
- Camping equipment for a hotel-based trip
- Random “just in case” objects
There are exceptions, of course. A Ladakh trip and a weekend ride near Bengaluru shouldn’t have the same list.
But if an item hasn’t solved a real problem in previous trips and isn’t needed for the current route, ask yourself why it is coming.
Your back, shoulders and motorcycle will thank you.
The One-Question Packing Test
Before putting something into the luggage, ask:
“What problem does this solve?”
If the answer is safety, weather, health, motorcycle maintenance, navigation or genuine daily use, it probably deserves consideration.
If the answer is “I might need it,” look again.
That doesn’t mean becoming ridiculously minimalist. Indian road trips can involve unexpected rain, temperature changes, poor roads and long distances between services. Some backup items are absolutely worth carrying.
But there’s a difference between preparation and anxiety packing.
A spare charging cable makes sense.
Three spare charging cables probably don’t.
A puncture kit makes sense.
A full workshop toolbox probably doesn’t.
The best motorcycle road trip packing list should leave you prepared, not overloaded.
Motorcycle Packing by Trip Type and Destination
There isn’t one universal motorcycle packing list for India.
A weekend ride has different needs from a week-long highway trip. A Himalayan ride can require warm layers that would be absurd on a summer coastal route. A monsoon trip needs waterproofing that may barely matter during a dry winter journey.
So instead of creating a separate giant checklist for every destination, start with the core list and adjust it.
That keeps the process manageable.
Short Weekend Motorcycle Trip
For a one- or two-night ride, focus on:
- Essential riding gear
- Rain protection
- One or two changes of clothes
- Basic toiletries
- Documents
- Phone and charging setup
- First aid
- Puncture kit
- Inflator
- Basic tools
- Water and snacks
This should be the easiest trip to pack for.
If you’re taking more luggage than you could comfortably manage for a week-long holiday, stop and reconsider.
5-7 Day Highway Road Trip
For a longer highway ride, add:
- More clothing
- Laundry planning
- Extra socks and underwear
- Additional weather layer
- More comprehensive personal medicines
- More deliberate luggage organisation
- Emergency equipment
- Spare charging options
This is where a saddle bag plus tank bag combination becomes particularly useful.
You can keep the clothing and larger items in the main luggage while keeping documents, phone-related items and snacks close at hand.
The temptation is to add everything. Resist it.
Himalayan, Ladakh or High-Altitude Ride
High-altitude trips require a different mindset.
Layering becomes more important than simply carrying lots of clothing. You may experience significant temperature changes during the same day, so your luggage needs to accommodate warm layers without becoming excessive.
Weather can also change quickly in mountain regions. Rain and cold protection deserve more attention than they would on a straightforward city-to-city highway trip.
Carry the motorcycle emergency equipment you know how to use, and plan fuel and service stops carefully.
I could be wrong about the exact clothing quantity because routes and seasons vary so much, but one thing is consistent: mountain trips punish poor preparation more quickly than short weekend rides.
Monsoon Motorcycle Road Trip
For monsoon riding, waterproofing moves near the top of the list.
Carry:
- Rain jacket/rain suit
- Spare socks
- Protected dry clothes
- Waterproof document pouch
- Protected electronics
- Luggage rain protection
- Quick-access towel or wipes
- Puncture equipment
Check your luggage after the first serious rain rather than assuming everything inside stayed dry.
Wet clothing should also have its own place. Don’t mix it with the clothes you plan to wear later.
And slow down when conditions require it. No packing list can compensate for riding too fast on a wet Indian highway.
Final Verdict: Pack Less, Prepare Better
The best motorcycle road trip packing list isn’t the longest one. It’s the one that leaves you with the essentials and removes the things that looked useful at home but become dead weight on the highway.
For most Indian road trips, I’d put safety gear, rain protection, documents, basic motorcycle emergency equipment, hydration and practical clothing at the top. Then organise the luggage so that the things you need frequently stay accessible.
A tank bag can handle small essentials. Saddle bags can handle clothes and larger items. Emergency equipment should never be buried underneath everything else.
If the packing list is making you realize how many moving parts a longer trip has, you can also explore our custom travel itinerary service to have the route and trip plan organized around your travel needs.
And if you’ve chosen the destination but haven’t figured out the route and day-by-day plan yet, our custom trip planner can help you put those pieces together. If you’re starting your trip from Kolkata and want to turn the ride into a wider West Bengal or Kolkata holiday, you can also check our custom Kolkata tour package options.
The final test is simple: if you can explain why every important item is in your luggage, you’re probably ready.
If you’re planning more trips after this one, you can always browse AlarTravels for more practical travel guides and destination ideas.
Ride prepared. Pack sensibly. And leave a little empty space – you’ll probably find something worth bringing home.
Frequently Asked Questions
What should I pack for a motorcycle trip?
Start with the things that protect you and keep the motorcycle running: helmet, riding jacket, gloves, suitable riding protection, rain gear, documents, basic tools, puncture repair equipment and a tyre inflator. Then add clothes, toiletries, electronics, medicines, water and snacks.
For an Indian road trip, I’d also keep some cash alongside digital payment options. Network coverage and payment availability can vary on remote stretches.
The biggest mistake is treating every item as equally important. A spare T-shirt can wait. Your driving licence cannot.
How do I pack efficiently for motorcycle touring?
Use separate luggage zones. Put frequently accessed items such as your phone, wallet and documents in the tank bag. Keep clothes and larger items in saddle bags, and store emergency equipment somewhere you can reach without unpacking everything.
Keep heavy items low and distribute weight sensibly between the sides.
Compression can help with clothing, but don’t compress everything into an impossible-to-open package. You’ll eventually need something from inside.
Pack for the actual trip length and weather. A three-day ride shouldn’t require seven days of clothing simply because you have available luggage space.
How much clothing should I pack for a motorcycle tour?
For a 2-3 day trip, around two T-shirts, two or three sets of underwear and socks, one casual trouser and suitable layers can be a reasonable starting point.
For a 5-7 day trip, consider around three to four T-shirts, four to five sets of underwear and three to four pairs of socks, then adjust for weather and access to laundry.
These aren’t rigid rules. Cold-weather and camping trips can require considerably more.
I’d rather wash a lightweight shirt during a longer trip than carry a huge clothing bag. Motorcycle luggage space is valuable.
What tools are essential for motorcycle touring?
Carry the tools you may realistically need for your motorcycle rather than a generic toolbox.
A basic toolkit, puncture repair kit for tubeless tyres, portable tyre inflator, spare fuses, zip ties, duct tape, chain lubricant and spare key can form a useful starting point.
But learn how to use the equipment before departure.
A puncture kit is not magical. An inflator isn’t useful if you haven’t figured out its power connection. And a tool that doesn’t match your motorcycle’s fasteners is just extra weight.
Should I bring camping gear or stay in hotels?
It depends on the trip.
If you’re staying in hotels, guesthouses and homestays, carrying camping equipment can add a surprising amount of bulk. In that case, I’d leave the tent, sleeping equipment and cooking gear at home unless you have a specific reason to carry them.
Camping makes more sense when the route is designed around it, accommodation is limited or you genuinely enjoy that style of travel.
Don’t mix the two approaches casually. Carrying hotel-based luggage plus a complete camping setup can turn a manageable motorcycle into an overloaded one.
How much should I pack for a long motorcycle trip?
Trip duration is only one factor.
A 7-day summer trip may require less luggage than a 4-day cold-weather trip. Camping, photography equipment and special riding gear can also increase the load.
As a rough guide, 35-45L can be a practical starting range for a 5-7 day trip, while longer or more equipment-heavy trips may need 40-60L or more.
But don’t treat those figures as a target to fill.
The correct amount is the amount that carries what you genuinely need without making the motorcycle unnecessarily cumbersome.
What should I inspect on my motorcycle before a long trip?
Check tyre condition and pressure, brakes, chain, engine oil, coolant where applicable, battery, lights, indicators, horn, mirrors, fuel and visible fasteners.
Also inspect the luggage mounting points once the bags are installed.
Take a short local ride after loading the motorcycle. This lets you notice unusual movement, loose straps or an uncomfortable luggage position before you’re hundreds of kilometres from home.
Doing this in your driveway is much easier than discovering a problem beside an unfamiliar highway.
What tools should you take on a motorcycle road trip?
A compact motorcycle-specific toolkit, tubeless puncture repair kit if appropriate for your tyres, tyre inflator, spare fuses, zip ties, duct tape, chain lubricant and spare key are useful starting points.
Tube-tyre motorcycles require different puncture preparation, so don’t assume a tubeless repair kit is enough.
The most important tool is knowledge. If you don’t know how to perform a particular repair, learn the basics before the trip or understand where roadside assistance and mechanics are likely to be available.
Don’t carry an enormous toolbox simply because it makes you feel prepared.


